
Data scientists often have to communicate results to other people. In my case, my supervisors might want to see some numbers or I have to write up the main insights of some work for a paper.
This is pretty straightforward — I just copy and paste into an email or a Latex document. But what if I want to send someone an actual model that I have trained, so that they can either evaluate or use it? If the person in question is technical enough, then I can just save the model to disk and email that, along with some Jupyter notebooks.
But what if you want someone in marketing to try out a model, or you want to share it with friends who might find it interesting? In this case, you’ll need to make your code accessible to them in a way they are familiar with.
The three parts to this tutorial are:
- Creating a simple model that can be deployed to the web, where users can input variables to get predictions.
- Building the components needed by Flask microframework to create a web app.
- Deploying the final web app using the Heroku platform.
The final product will look like this: http://bike-model.herokuapp.com/ — and if you know CSS (which I find much harder than machine learning, for some reason) then you could easily make it look a lot fancier!
There are a lot of tutorials for Flask online, but they can be a bit overwhelming and tend to focus on toy examples like a blog app or a to-do list, with many features we don’t need. In this guide, the focus is on exactly the things you need in order to get your model up and running on the web as quickly as possible.
The model we will deploy is is based on this Cambridge Spark tutorial, using the xgboost package. Our model will perform regression on the data from this tutorial, using three environmental variables (temperature, humidity, windspeed) to predict the number of bikes that will be rented out from a bike sharing scheme. However, you could deploy any model you like!
Software requirements
Make sure you have the following installed if you want to copy and paste code from this page:
- Python 3.6+
- python packages:
- Flask
- Pandas
- Sklearn
- Xgboost
- Seaborn
- Matplotlib
You will also need the following tools installed:
- Git
- The Heroku CLI
Git repository
The final web app can be found on Github at https://github.com/alexanderrobertson/cambridgespark-webapp.
Part 1 : Creating a model for deployment
The first thing we will need is a model. Did you know that pandas can load data from a URL? No need to save to disk — pretty handy if you just want to quickly look at some data!
In [1]:
import pandas as pd

data = pd.read_csv('https://raw.githubusercontent.com/cambridgecoding/machinelearningregression/master/data/bikes.csv')

data.head(3)
Out[1]:
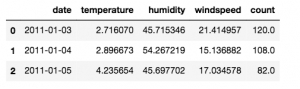
Pre-processing the data
The variable we want to predict is count and we'll do this using temperature, humidity and windspeed.
We won’t use date for our prediction, but it might be useful for plotting. Let's convert it to a datetime object so that we can easily extract information from it, like the day of the week, month and year.
In [2]:
data['date'] = data['date'].apply(pd.to_datetime)

data['year'] = [i.year for i in data['date']]

data['month'] = [i.month_name()[0:3] for i in data['date']]

data['day'] = [i.day_name()[0:3] for i in data['date']]
Visualising the data
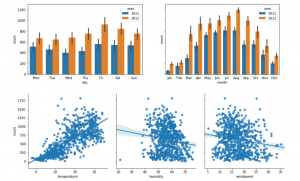
We can look quickly at the pattern of bike usage over time with some simple barplots. The information extracted earlier from the date column makes it easy to adjust granularity from days to months, as well as compare years.
It’s also useful to quickly visualise the variables we are interested in. The seaborn package is great for this. A pairplot will show the relationship between the target variable count and all other variables. By passing kind='reg' to the plotting function, a regression line can be fitted. This gives an indication of whether there might be a useful linear relation between variables.
It looks like there may be a good relationship between temperature and the number of bikes hired. But let’s just use all the data for our model for now.
In [ ]:
import matplotlib.pyplot as plt

import seaborn as sns

%matplotlib inline
In [4]:
figure, (ax1, ax2) = plt.subplots(nrows=1, ncols=2, figsize=(14,4), sharey=True)
bp1 = sns.barplot(data=data, x='day', y='count', hue='year', ax=ax1)
bp2 = sns.barplot(data=data, x='month', y='count', hue='year', ax=ax2)
pp = sns.pairplot(data=data,
y_vars=['count'],
x_vars=['temperature', 'humidity', 'windspeed'],
kind='reg',
height=4)
/home/alexander/anaconda3/envs/bell/lib/python3.6/site-packages/scipy/stats/stats.py:1713: FutureWarning: Using a non-tuple sequence for multidimensional indexing is deprecated; use `arr[tuple(seq)]` instead of `arr[seq]`. In the future this will be interpreted as an array index, `arr[np.array(seq)]`, which will result either in an error or a different result.
return np.add.reduce(sorted[indexer] * weights, axis=axis) / sumval
Train the model
In [5]:
import xgboost as xgb

from sklearn.model_selection import train_test_split

x = data[['temperature', 'humidity', 'windspeed']]

y = data['count']

X_train, X_test, y_train, y_test = train_test_split(x, y, test_size=0.1, random_state=1)

classifier = xgb.sklearn.XGBClassifier(nthread=-1, seed=1)

classifier.fit(X_train, y_train)
Out [5]:
XGBClassifier(base_score=0.5, booster='gbtree', colsample_bylevel=1,

       colsample_bytree=1, gamma=0, learning_rate=0.1, max_delta_step=0,

       max_depth=3, min_child_weight=1, missing=None, n_estimators=100,

       n_jobs=1, nthread=-1, objective='multi:softprob', random_state=0,

       reg_alpha=0, reg_lambda=1, scale_pos_weight=1, seed=1, silent=True,

       subsample=1)
Evaluate the model
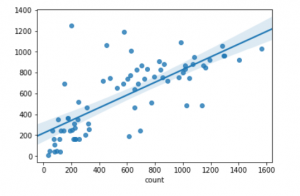
There are several intrinsic evaluation metrics for regression models. To see how our predictions match the true values, we can calculate R2, Mean Absolute Error and the Explained Variance. Briefley, we want R2 and EVS to be close to 1.0 and MAE to be close to 0. We can also plot predictions against truth in a regression plot, which will automatically fit a line for us.
(Note: if you aren’t familiar with f-strings, which were introduced in Python 3.6 with PEP 498, take a look at this blog post for more details. They make it super easy to reference and format variables inside a string.)
In [6]:
from sklearn.metrics import r2_score, explained_variance_score, mean_absolute_error
In [7]:
predictions = classifier.predict(X_test)
print(f'R^2 score: {r2_score(y_true=y_test, y_pred=predictions):.2f}')
print(f'MAE score: {mean_absolute_error(y_true=y_test, y_pred=predictions):.2f}')
print(f'EVS score: {explained_variance_score(y_true=y_test, y_pred=predictions):.2f}')
rp = sns.regplot(x=y_test, y=predictions)
R^2 score: 0.54
MAE score: 198.39
EVS score: 0.54
/home/alexander/anaconda3/envs/bell/lib/python3.6/site-packages/sklearn/preprocessing/label.py:151: DeprecationWarning: The truth value of an empty array is ambiguous. Returning False, but in future this will result in an error. Use `array.size > 0` to check that an array is not empty.
if diff:
/home/alexander/anaconda3/envs/bell/lib/python3.6/site-packages/scipy/stats/stats.py:1713: FutureWarning: Using a non-tuple sequence for multidimensional indexing is deprecated; use `arr[tuple(seq)]` instead of `arr[seq]`. In the future this will be interpreted as an array index, `arr[np.array(seq)]`, which will result either in an error or a different result.
return np.add.reduce(sorted[indexer] * weights, axis=axis) / sumval
Getting the model ready for deployment
We can save our trained classifier model to disk using pickle. It can then be reloaded later on and used exactly as if we had trained it.
In [8]:
import pickle
with open('bike_model_xgboost.pkl', 'wb') as file:
pickle.dump(classifier, file)
Part 2: Creating a web app with Flask
There are several things we need to put together for the web app. The first two are:
- The Python code that will load our model, get user input from a web form, do predictions, return results.
- The HTML templates that flask with render. These allow the user to input their own data and will present the results.
The app will initially be structured like this:
webapp/

    ├── model/

    │   └── bike_model_xgboost.pkl

    ├── templates/

    │   └── main.html

    └── app.py
I’ll first create extremely an basic app.py and main.html, to demonstrate how flask works. We will expand these later on to suit our needs.
app.py
This is the core of your web app. It’s what will run on the Heroku server, send out web pages and process input from users.
In flask, URLs get routed to different functions. Here, you can see that going to the base URL (e.g. www.cambridgespark.com) will trigger the main()function. This function simply serves up the main.html file, the location of which was specified when app was created. You can set up all sorts of routes for logging in, displaying data or similar.
import flask

app = flask.Flask(__name__, template_folder='templates')

@app.route('/')

def main():

    return(flask.render_template('main.html'))

if __name__ == '__main__':

    app.run()
main.html
This is what the template file looks like at the moment. All it does is display a simple message. We’ll edit this later on to suit our needs.
<!doctype html>

<html>

<head>

<title>Web app name</title>

</head>

<h1>Hello world.</h1>

</html>
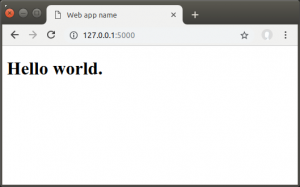
Running the test app
To start up flask on your local machine, make sure you are in the webappfolder and run the command:
flask run
This will launch your app locally, at http://127.0.0.1:5000/. It should look something like this:
<code class="markup--code markup--pre-code"></code>
It’s really easy to turn this basic example into an app that will let people input values for temperature, humidity and windspeed, and get a predicted value for the number of bikes being rented. The changes we need to make are:
- Edit app.py to load the model
- Expand
main()to prompt for user input, retrieve user input, make predictions and return predictions. - Edit main.html to have a form that gets the input we need, allows users to submit input and renders predictions.
Editing app.py to load the model
Below you can see the extended app.py. With a pickled model, we don’t need to import xgboost or anything — we just assign it to a variable — but we do need to have the required packages installed. Notice that we load the model at the top of the app. This means it will only get loaded into memory once on the server when we deploy it, rather than being loaded every time we want to make a prediction.
import flask

import pickle

# Use pickle to load in the pre-trained model.

with open(f'model/bike_model_xgboost.pkl', 'rb') as f:

    model = pickle.load(f)

app = flask.Flask(__name__, template_folder='templates')

@app.route('/')

def main():

    return(flask.render_template('main.html'))

if __name__ == '__main__':

    app.run()
Expanding the main() function
Our app will run in two modes. In one, it will be displaying the input form to the user. In the other, it will be retrieving that input. This uses two different HTTP methods: GET and POST.
Our app will run in two modes. In one, it will be displaying the input form to the user. In the other, it will be retrieving that input. This uses two different HTTP methods: GET and POST.
If a user loads the main URL for the app (e.g. http://myapp.herokuapp.com/), flask will receive a GET request and render main.html.
If the user fills in the form on the page and clicks on a submit button, flask receives a POST request, extracts the input, runs it through the model and will finally render main.html with the results in place. The user can then view that result and submit more data for processing.
Flask extracts the data from the form with the flask.request.formfunctionality, which works like a dictionary. We can grab the data we want from the form by referring it to the name. This name will be set in the main.html template, later on.
Once we have our three variables, the classifier needs them in an expected format. I’ve used a pandas DataFrame here, because it allows us to specify the order of the columns and their datatype. It’s important to make sure these are float, since the model expects these rather than int.
Passing all this to the model for prediction returns a single item inside an array, which can be extracted by indexing it.
Finally, the function renders the main.html template but now it also returns two variables: the original input and the result. These will be explained in the changes that are needed for main.html.
@app.route('/', methods=['GET', 'POST'])

def main():

    if flask.request.method == 'GET':

        return(flask.render_template('main.html'))

    if flask.request.method == 'POST':

        temperature = flask.request.form['temperature']

        humidity = flask.request.form['humidity']

        windspeed = flask.request.form['windspeed']

        input_variables = pd.DataFrame([[temperature, humidity, windspeed]],

                                       columns=['temperature', 'humidity', 'windspeed'],

                                       dtype=float)

        prediction = model.predict(input_variables)[0]

        return flask.render_template('main.html',

                                     original_input={'Temperature':temperature,

                                                     'Humidity':humidity,

                                                     'Windspeed':windspeed},

                                     result=prediction,

                                     )
Editing the main.html template
The template needs expanded with a form, plus a way of determining if results need to be rendered and, if so, to render them. The HTML code for this is below.
Important components:
The form
<form action="" method="POST">
Meet the Author
Alexander Robertson is a Data Science PhD student at the University of Edinburgh, where his research focuses on variation, usage and change in natural language and also emoji.